Showing posts with label blog images. Show all posts

Monday, 13 June 2011

Customise your Blog Background on Layout Templates

Looking for a great way to update the appearance of your blog?  One of the simplest ways to make your blog your own is to change the background - and that's what I'm going to look at in this post.

There are different things you can do if you're going to customise your background - and the way that you go about it will depend upon what template you're using, for this post, I'll cover the basics of changing your background if you're using one of the new layout templates. (If you're looking for my post on HTML background changes or changing an older template I've covered How to Customise your Blog Background in HTML in this post here).

Customising the background on a Layout Template
If you're using a layout  template then you have the option to do one of two things - update the colour or pick a photo background. In both instances, you need to start by going to your 'Design' tab and clicking on 'Template Designer'. The first thing you'll need to do is select a template on this page in order to make the changes.

To choose a colour only, click on the 'Background' option, then select a colour theme from the right.


If you want to pick a specific colour using a 'hex' number, then select after you select the main colour theme, select 'Advanced', 'Background' and enter that number there.


If you'd prefer to use a photos for your background, then you can pick one from the many different choices blogger offers, or you can upload your own image and use that to create a background all of you own.

To upload an image of your own, select the drop down menu at the side of the 'Background' button and at the top left of the pop out, you'll see a box that says 'Upload Image'. You then simply select your file and you'll be shown a preview of how it will look on your blog.
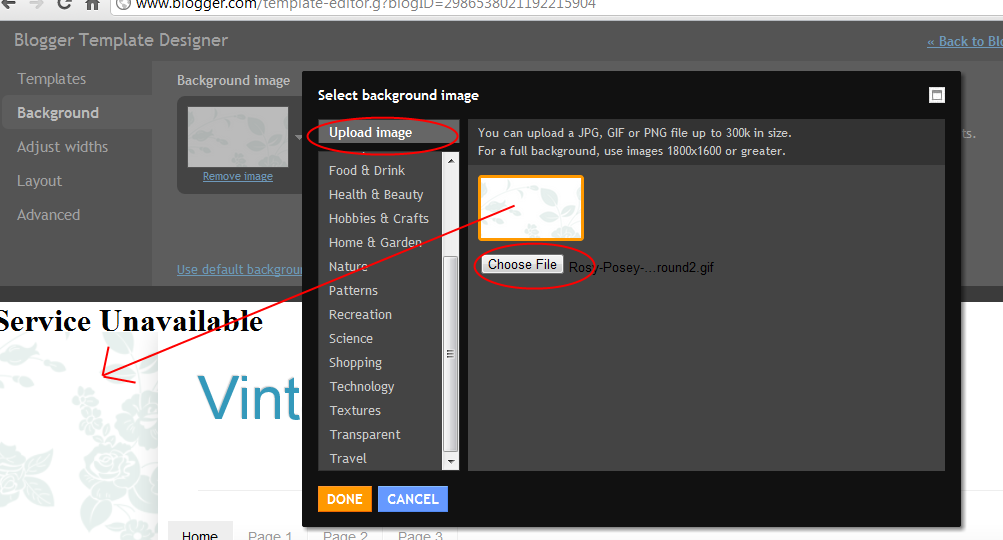


** Note - if you want a full screen image, blogger advises something no smaller than 1800 by 1600 pixels. If you do use something smaller it will be tiled or repeated on the background. On the plus side, you can adjust how this will happen, by changing alignment, tiling direction and whether the image scrolls.


If you're happy with the preview, then click 'Done' to continue with any other changes you wish to make, or go to the top right and select 'Apply to Blog' to finish!

If you have any questions, please let me know! 

Friday, 10 June 2011

Friday Freebies and Linking to Images

Hello lovely people! Today I've got made some super simple banners for sidebar linking. If you've got a blog page on Facebook, Twitter and you want to let people find an easy way to email you - then these are perfect for that.

I've done 3 sets of 3 images to start with, in green, purple and blue - but if you'd like to see more of these in another colour let me know and I'll try and add it in here.


Of course, these are not a lot of good if you don't know how to link to them - so I'll explain that now!

There are two options you have. Firstly, you can insert these as a picture and then link to them individually as 3 pictures. That's not necessarily a bad option, but unless you want to start making changes in your template - they will probably end up looking like this:


I prefer to group these together (like I have on my sidebar here), so an alternative option which I recommend is to add these as HTML (and don't worry, you can do that very easily in your sidebar elements).

In order to do that, you'll need to start by uploading the images you want to use to a photo hosting site such as Photobucket.

Once you've uploaded them on there, go into Blogger and go to the 'Design' page. Select 'Add an element' for your sidebar and then select the option that says 'HTML/Java Script'.

This will cause a window to pop up in which you can enter a title and a space for the code.

You'll then need to enter the following code and make the changes outlined below:

<div align="center"> <a href="URL1" target="_blank"><img alt="Image Name1" src="Image URL1"/></a> </div>

<div align="center"> <a href="URL2" target="_blank"><img alt="Image Name2" src="Image URL2"/></a> </div>

<div align="center"> <a href="URL3" target="_blank"><img alt="Image Name3" src="Image URL3"/></a> </div>


Once you have that code, you then need to change the following:
URL - This needs to be replaced with the link that you want to direct the reader to. Eg. The Twitter image will link to your Twitter page, Facebook to Facebook page and so on.
Image Name - Just enter a short phrase to describe the image. Eg.. Twitter button.
Image URL - This is the URL or web address of the image that you've uploaded to Photobucket and it should look something similar to this... http://i1219.photobucket.com/albums/dd432/LullilooDesigns/Lulliloo-background-2.gif

After you've made the changes outlined, click save and then position the element where you'd like it to appear in your side bar.

Please let me know if you have any questions!

Saturday, 28 May 2011

Manually Resize Pictures and Add Tags

If you include a lot of images in your posts, then you may find it useful to resize pictures manually to ensure they fit well on your page and it can help to balance them out so that the series of images are in proportion to each other. This offers more control than if you use the pre-set small, medium or large options that Blogger offers.

You may also find it useful to add image tags (also known as 'alt tags'). If you're unfamiliar with these tags, they are the pop up tags that often appear when you hover your mouse over the image. These are there for people who are unable to view the images, but they are also useful for getting your images to rank in search engines. If you have a website or blog that supports the sales of your handmade or other products, then this is a good way to help people find your blog or products via searches such as Google Images.

To resize your picture's manually, rather than using the small, medium or large, the  first thing to do is upload your images. It is still worthwhile using the size the corresponds with the general size  you wish to use, and then start to resize the images once they are on the blog.


The first step to change the image size is to click on the Edit HTML tab (no. 1).
Once you are on this screen, you then need to look for the width and height part of the code (no. 2). These may be grouped together or further apart, depending on your blog.
To resize the image, you need to change these numbers. One of the most important aspects of this is to ensure that you keep the proportions in balance as much as possible to prevent your picture from looking distorted.

In this second screen shot, you can see that I've changed the sizing to reduce the images roughly by half, bringing the size down from 810 x 720 to 404 x 362.  (If you have an image that you wish to make bigger, be aware that this may result in fuzziness/image pixellation. )


Once you've done this, take a look in the preview and make further changes as necessary. The more familiar you are with this, the easier it will become for you to estimate sizes.


The final step I'm going to show is how to add in image tags to describe your pictures. To do this, look for the part of the code marked alt. Next to that between the " and " you can add a few words to describe your image. The more relevant these are also to your post content and overall blog content, the better it is for your blog or site SEO.

Once you've done all that - you can preview your post and if you're happy, it's ready to be published!