Showing posts with label customise your blog. Show all posts

Friday, 16 December 2011

Festive Sale!

With Christmas just around the corner I'm offering a super special festive offer of 20% off any purchases via my Etsy shop.


If you're interested in a custom blog design, one of my premade templates or one of a kind blog templates - or your own Etsy shop banner set or logo, enter the discount code FESTIVE2011 at the checkout to redeem your 20% off when you make a purchase!

Visit Crafty Lil' Fox on Etsy shop to find out more about what's on offer...

Have a great weekend! 
Melissa

Thursday, 8 September 2011

Free Online Tools for Blogger (Blogspot) Design

If you're planning on making changes to your blog, or you want to make your blog posts and content look as professional as possible, then you'll quickly discover that having the right tools for blog design and web design makes it a whole lot easier to bring your ideas to life. Chances are however, that if you're doing your own blog design as a one off, you don't want to spend up to get software like Photoshop or Illustrator just to makeover your blog. The good news is there are some great tools out there that you can make use of to create attractive headers, background and illustrations for your blog without spending a thing.

To help you in the right direction, I thought I'd just do a quick post covering some of the great, FREE tools that you can use to create a professional look for your blog.

So here (in no particular order), are some useful sites to check out:

Pixlr - This online application has an inbuilt photo editor so that you can present professionally edited images to enhance your blog posts. If you're promoting your products or services online, then this is also a great tool for preparing your photos for uploading on your website or on sites such as Etsy or Folksy. Pixlr also has inbuilt tools for quickly uploading images onto social networks such as Facebook and MySpace.

Inkscape - This application is an open source drawing tool that works much like Adobe Illustrator. If you'd like to create Scalable Vector Graphics (SVG), then this is a great way to do it without Illustrator. With this tool you can draw lines and curves to create cute cartoon style vector images for your blog.

Picnik - Picnik can be used to create headers with a variety of frames and the means to drop your own images into the header. You can add in different fonts and other elements to create an original blog header or store banner without having to spend a lot of money on professional tools to get the look you're after.

Gliffy - If you're planning on sharing information via your blog, such as 'how to's' for craft projects, technical details of a product you offer or other information such as knitting charts, then this is an online diagram tool for creating quality flowcharts, diagrams, and technical drawings. There is a user friendly interface and intuitive easy to understand tools and functions.

Using these tools will help you to create professional looking graphics, illustrations and diagrams - these will enhance the appearance of your blog and help you to share your ideas and knowhow with your readers.

Wednesday, 3 August 2011

Giveaway Winners!

Thank you so much to everyone who has visited the blog and has taken part in the giveaway!
It has been so nice to find some new blogs and meet new people - so much so, that I will probably make this a regular thing (I've just got to decide how frequently I can manage!).

In the meantime, I've tallied up everyone's entries, placed the names in a hat and the winners are..... (drumroll, please!)....  Amanda from Handmade Lovin'  and Kacee from You Had Me At Scrap

Congratulations to the winners - I will email you if I have your address and/or visit your blogs to let you know you've won or if you haven't heard from me already, please email me.

Have a great week everyone - Melissa x

Thursday, 28 July 2011

Using Google Fonts in Layout Design

Did you know that you can have the same cool fonts that are in the template designer - without starting from scratch with your blog?

If you've been doing any design work on your blog, chances are you've been making your changes from a layout template like Minima. And if you're just taking your first steps with customising your blog, I'm sure most people will agree that these are sooooo much easier for basic CSS/HTML customisation than the new blogs. One of the downsides, however, is that you could be missing out on some of the groovy new fonts. 

Well now you don't have to!

If you'd like a particular font that you've seen on a new blog, then I'm going to show you an easy way to install it in your blog.
To begin, head over to the Google Web Fonts Directory. Once you're there, simply look for a font that suits the style you're after.
When you find a font you like, click on 'Quick-use' option on the right and it will take you to page that looks like this:


Scroll down the page to Step 3 and you'll see this:


Copy the code section from Step 3 and go back to your blog.

Open the Design tab, then go to 'Edit HTML'.  (Tip - backup your blog before editing the HTML pages).
To install the font, simply copy the code for the font directly after the first <head> tag. 
After you've done this, you'll need to make two small changes. 
Firstly, you will need to find the & symbol - and add 'amp;' directly following it (without the quotes). Secondly, you'll need to add a '/' symbol (without the quotes) just before the closing of the font code. 
The head tag is circled in the image below, and the changes you'll need to make are also circled in the image below.  


And that's it - your new font is installed and ready to use! You can use it in your header, post titles or sidebar - whererever you like!
I recommend making a change to one type of title initially, then clicking on Preview to check everything is  installed correctly. If it's all working,  then save the changes you've made before making further changes to titles on the blog. 

Changing title fonts:
To make changes to titles, you'll need to replace the current font with the name of the font you've installed. If you're not sure what the correct name of the font is, see step 4 on the Google Fonts site for the correct details.
To find the sections you want to make changes to, type Ctrl F to search the blog code. 

If you want to change the post titles, search for 'post-title' and to find the section that looks like this:


To change the sidebar titles, search for 'sidebar' and find the section that looks similar to this:


**In both these instances, you'll see that you can also change the font size and colour in the same section of code, as well as the font family.

Once you've finished making any changes, click Preview to see how it all looks. When you're happy with your new font, just save and you're done! 

Melissa x


Thursday, 14 July 2011

Giveaway!

Welcome to the Big July Blog Giveaway!


I'm sorry that posting has been a bit erratic the last few weeks, I've been super busy working on lots of new things and helping some lovely ladies make their blogs look beautiful!
So as a way of thank you to everyone for being patient with my lack of posts, I'm going to hold a special blog giveaway.  I'm giving away two premade blog templates and shop sets from my online Folksy and Etsy shops.

Each template winner will receive the template of their choice (just like these below!) and the matching shop banner and avatar set, fully customised with their own blog or shop headline, descriptions and icons, all fully installed on their blogger (blogspot) blog.


You can find more examples of the premade blog templates over here.

Entries will be open from now until the end of July and I'll be adding fresh templates throughout that time, so there will be plenty of options for the winners to choose from!

If you'd like to enter, here's how you can join in:
Follow my blog - 1 entry
Post my button on your sidebar - 1 entry
Follow on Facebook - 1 entry
Mention my giveaway on Twitter - 1 entry
Mention my giveaway on Facebook - 1 entry
Mention the giveaway in a blog post - 2 entries

Multiple entries are allowed, so just leave a comment below and let me know any mentions you made - easy, huh?! Entries will close on the 31st of July and the winners will be drawn shortly after.

Good luck! 
Melissa x 

Tuesday, 21 June 2011

Beautiful Blog Backgrounds and Freebies

Hello! In my last two posts I described how to upload a blog pattern or background image.
A unique pattern or distinctive background image can really make your blog stand out, so today I'm going to share some backgrounds that I've designed, and share some ideas about where how to get your ideal background pattern.

At the top of my list of things to check out is the post, 'Pattern Resources for Making Your Own Blog Backgrounds' at Makin' Cute Blogs. This post covers a really comprehensive list of sites where you can source and create unique blog backgrounds.

One of my favourite sites (and I know I mention it a lot) is ColourLovers - where you can either make your own pattern, or find a pattern template to colour all of your own.

Here are some examples of the kinds of patterns you can make - or you can download these to use via the links underneath.


**Instructions**
To upload one of these patterns to your own blog, follow the link beneath the image and then click on 'Preview'.

When the image appears, right click and select save as.

You now have a pattern ready for use on your blog!

To install it, visit my last posts for instructions on how to change your background
To change the background in Template Designer go here.
To change the background in an older style template go here.

Let me know if you have any questions and make sure to post a link below to show of your new look blog!

Monday, 13 June 2011

Customise your Blog Background in HTML

Want to keep your older style blog template, but think it's looking ready for a bit of a revamp? Well, this post is going to cover how you can make some simple changes to your blog HTML to change the appearance of your blog background. I'll show you how to add in a link to an image or pattern, or how to select a custom colour to match the palette you've used on your blog.
(**If you're looking for my post on Customising Your Blog Background on Layout Templates, you'll find it here.)

If you're using an older blog template, then it can be really useful to know how to customise your blog background in HTML.  If you're not confident with using HTML, this can seem a little more challenging than if you're using the Template Designer option, but it is pretty straight forward once you get the hang of it.

To change your HTML, you need to firstly go to your 'Design' tab and click 'Edit HTML'.


The very first thing you should always do is save a copy of your template, so that you have a backup if anything goes wrong.


After you save that, type CTRL F, and type in body to find the section of your template that looks something like this:


Once you're there, you can now make changes by either selecting a custom colour, or by adding in a background image.

Adding custom colour to older style blog templates
This is super easy once you've reached this stage. Simply take the hex code that you want to use from your palette and enter the details here like this:


** Some templates will let you leave the wording as just background, others will not accept the change unless you change this to 'background-color'.

Select 'preview' to check the appearance of your template and if you're happy with the background colour click save.

***Tweaking the post/sidebar background area***
A common problem that can arise when you change the colour or add a pattern or picture background is that it makes the post hard to read if it shows through. To stop that happening, find the following section of code and change the color to prevent that happening (in this case I've changed it to white).


Adding a photo or pattern background to your blogger template
The first thing you need to do is upload the photo or pattern that you wish to use to an image hosting site. For this I've used Photobucket.

Once I've done this, I need to look for the same section of HTML code that you change to add a custom colour, which looks like this:


To change the background colour to an image, type 'URL', then copy and paste the URL of the image you uploaded in brackets next to it. It will now look like this:


Preview your blog and if necessary tweak the post/sidebar background (as above) and once you're happy with the changes you're done!

You now have a unique colour or pattern that will really make your blog stand out.

If you have any questions, please let me know! 

Customise your Blog Background on Layout Templates

Looking for a great way to update the appearance of your blog?  One of the simplest ways to make your blog your own is to change the background - and that's what I'm going to look at in this post.

There are different things you can do if you're going to customise your background - and the way that you go about it will depend upon what template you're using, for this post, I'll cover the basics of changing your background if you're using one of the new layout templates. (If you're looking for my post on HTML background changes or changing an older template I've covered How to Customise your Blog Background in HTML in this post here).

Customising the background on a Layout Template
If you're using a layout  template then you have the option to do one of two things - update the colour or pick a photo background. In both instances, you need to start by going to your 'Design' tab and clicking on 'Template Designer'. The first thing you'll need to do is select a template on this page in order to make the changes.

To choose a colour only, click on the 'Background' option, then select a colour theme from the right.


If you want to pick a specific colour using a 'hex' number, then select after you select the main colour theme, select 'Advanced', 'Background' and enter that number there.


If you'd prefer to use a photos for your background, then you can pick one from the many different choices blogger offers, or you can upload your own image and use that to create a background all of you own.

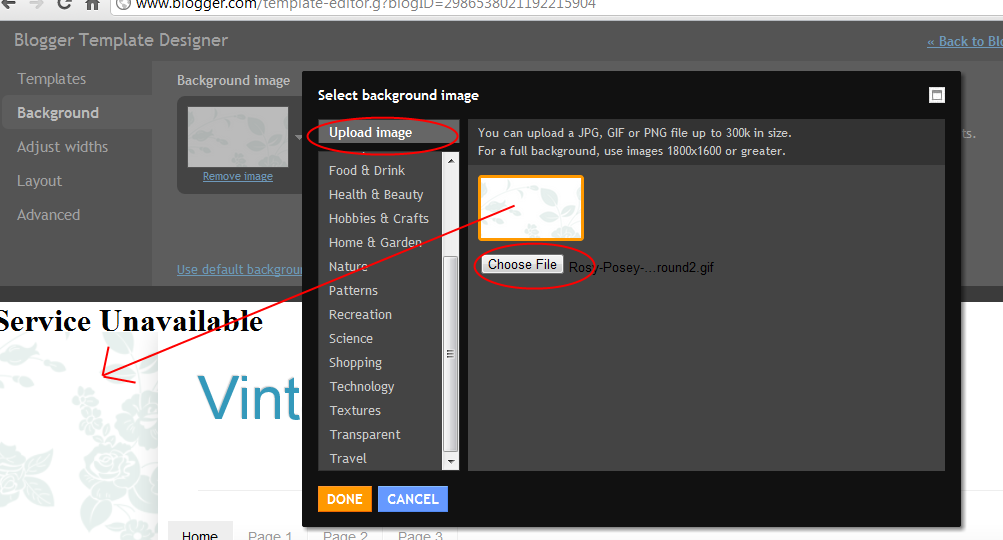
To upload an image of your own, select the drop down menu at the side of the 'Background' button and at the top left of the pop out, you'll see a box that says 'Upload Image'. You then simply select your file and you'll be shown a preview of how it will look on your blog.


** Note - if you want a full screen image, blogger advises something no smaller than 1800 by 1600 pixels. If you do use something smaller it will be tiled or repeated on the background. On the plus side, you can adjust how this will happen, by changing alignment, tiling direction and whether the image scrolls.


If you're happy with the preview, then click 'Done' to continue with any other changes you wish to make, or go to the top right and select 'Apply to Blog' to finish!

If you have any questions, please let me know!