Friday 24 June 2011

Blog Makeover Ideas

In my last post, I talked about how you can create a palette for your blog. So the question then is, how do you use that palette?  Well, there are several things you can coordinate to give your blog a professional finish  once you've picked out your colours.

Header
Your blog header if the first thing that people see when they get to your blog, and the style of header you choose and the colours, fonts and images can often say a lot more than your blog than you can convey in the title and description. If you have a blog that's about a particular theme or subject, such as a craft, then choosing a great font and photos or illustrations that reflect what you do helps to entice readers to delve further into your blog. If you make and sell handmade items, then choosing a colour palette that shows off your products to their best is a great option. You may also want to integrate some of your handmade items into a picture header that reflects your personal style and what you do that is unique.and

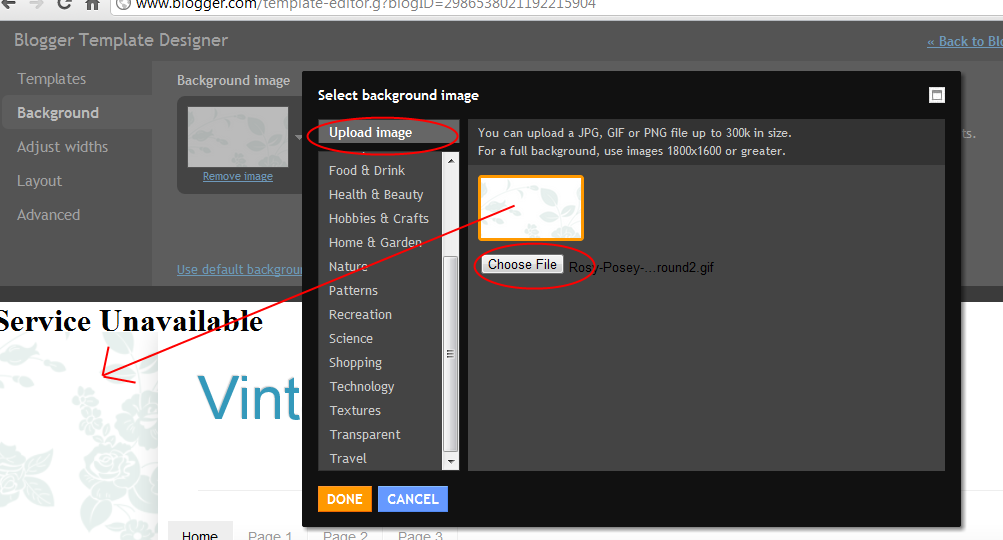
Your palette will come in useful as you select background colours, border colours and font colours for your header. If you've saved your palette details, then you can quickly and simply select the same colours over and over again by copying and pasting each colour's hex number. And don't worry if you don't have a program such as Photoshop - online software such as Pixlr provides you with a range of tools that will help you create a professional looking header. What's great about this is you can do the whole editing process in your browser window - and it won't cost you a cent!  (Just remember you must have permission from the photographer if you're using images that aren't your own).

Background
Changing your background is another way to make your blog unique, whether you want to go for a particular colour to complement your header or you're going to create or colour a unique pattern via sites like Color Lovers or Pattern Cooler.  Using colours from your palette makes it easy to keep your blog design consistent and will help you get a really professional looking blog page.

Adding a post signature
This option requires a little more technical knowhow, but adding a post signature that again color coordinates with your blog is a great way to make each post more personal and help to engage your readers. Online sites that allow you to customise a snippet of text for the post signature make this super easy, and with a bit of patience, you'll have a personalised signature and message to finish off each post you upload.


Using a blog template
If you don't have time to do customise your own blog, or you're not really up for mastering some of the HTML side of things, then templates are a great alternative to doing your own customisation. There are two options when it comes to using a template - firstly, you can find plenty of free templates online. These can be a great starting point and offer a quick and cheap solution to having a more unique blog. The downside is that you may find there are a number of others have the same blog template as you. The alternative is to purchase a template. These are usually sold in smaller quantities than free templates, so you can freshen up your blog with a really professional look for a very reasonable price. (You can view an example of a template I designed here.) 
The important thing to consider is whether you want something that is more unique, or if you're happy to have something that may be found elsewhere. A useful tip if you install the blog template yourself is to remember to always save a version of your current template (in case you have any technical hiccups) and select the 'Keep Widgets' option when installing, so that you don't end up having to re-install all the elements you've added to your sidebar.

Have a lovely day!

Tuesday 21 June 2011

Beautiful Blog Backgrounds and Freebies

Hello! In my last two posts I described how to upload a blog pattern or background image.
A unique pattern or distinctive background image can really make your blog stand out, so today I'm going to share some backgrounds that I've designed, and share some ideas about where how to get your ideal background pattern.

At the top of my list of things to check out is the post, 'Pattern Resources for Making Your Own Blog Backgrounds' at Makin' Cute Blogs. This post covers a really comprehensive list of sites where you can source and create unique blog backgrounds.

One of my favourite sites (and I know I mention it a lot) is ColourLovers - where you can either make your own pattern, or find a pattern template to colour all of your own.

Here are some examples of the kinds of patterns you can make - or you can download these to use via the links underneath.


**Instructions**
To upload one of these patterns to your own blog, follow the link beneath the image and then click on 'Preview'.

When the image appears, right click and select save as.

You now have a pattern ready for use on your blog!

To install it, visit my last posts for instructions on how to change your background
To change the background in Template Designer go here.
To change the background in an older style template go here.

Let me know if you have any questions and make sure to post a link below to show of your new look blog!

Monday 13 June 2011

Customise your Blog Background in HTML

Want to keep your older style blog template, but think it's looking ready for a bit of a revamp? Well, this post is going to cover how you can make some simple changes to your blog HTML to change the appearance of your blog background. I'll show you how to add in a link to an image or pattern, or how to select a custom colour to match the palette you've used on your blog.
(**If you're looking for my post on Customising Your Blog Background on Layout Templates, you'll find it here.)

If you're using an older blog template, then it can be really useful to know how to customise your blog background in HTML.  If you're not confident with using HTML, this can seem a little more challenging than if you're using the Template Designer option, but it is pretty straight forward once you get the hang of it.

To change your HTML, you need to firstly go to your 'Design' tab and click 'Edit HTML'.


The very first thing you should always do is save a copy of your template, so that you have a backup if anything goes wrong.


After you save that, type CTRL F, and type in body to find the section of your template that looks something like this:


Once you're there, you can now make changes by either selecting a custom colour, or by adding in a background image.

Adding custom colour to older style blog templates
This is super easy once you've reached this stage. Simply take the hex code that you want to use from your palette and enter the details here like this:


** Some templates will let you leave the wording as just background, others will not accept the change unless you change this to 'background-color'.

Select 'preview' to check the appearance of your template and if you're happy with the background colour click save.

***Tweaking the post/sidebar background area***
A common problem that can arise when you change the colour or add a pattern or picture background is that it makes the post hard to read if it shows through. To stop that happening, find the following section of code and change the color to prevent that happening (in this case I've changed it to white).


Adding a photo or pattern background to your blogger template
The first thing you need to do is upload the photo or pattern that you wish to use to an image hosting site. For this I've used Photobucket.

Once I've done this, I need to look for the same section of HTML code that you change to add a custom colour, which looks like this:


To change the background colour to an image, type 'URL', then copy and paste the URL of the image you uploaded in brackets next to it. It will now look like this:


Preview your blog and if necessary tweak the post/sidebar background (as above) and once you're happy with the changes you're done!

You now have a unique colour or pattern that will really make your blog stand out.

If you have any questions, please let me know! 

Customise your Blog Background on Layout Templates

Looking for a great way to update the appearance of your blog?  One of the simplest ways to make your blog your own is to change the background - and that's what I'm going to look at in this post.

There are different things you can do if you're going to customise your background - and the way that you go about it will depend upon what template you're using, for this post, I'll cover the basics of changing your background if you're using one of the new layout templates. (If you're looking for my post on HTML background changes or changing an older template I've covered How to Customise your Blog Background in HTML in this post here).

Customising the background on a Layout Template
If you're using a layout  template then you have the option to do one of two things - update the colour or pick a photo background. In both instances, you need to start by going to your 'Design' tab and clicking on 'Template Designer'. The first thing you'll need to do is select a template on this page in order to make the changes.

To choose a colour only, click on the 'Background' option, then select a colour theme from the right.


If you want to pick a specific colour using a 'hex' number, then select after you select the main colour theme, select 'Advanced', 'Background' and enter that number there.


If you'd prefer to use a photos for your background, then you can pick one from the many different choices blogger offers, or you can upload your own image and use that to create a background all of you own.

To upload an image of your own, select the drop down menu at the side of the 'Background' button and at the top left of the pop out, you'll see a box that says 'Upload Image'. You then simply select your file and you'll be shown a preview of how it will look on your blog.


** Note - if you want a full screen image, blogger advises something no smaller than 1800 by 1600 pixels. If you do use something smaller it will be tiled or repeated on the background. On the plus side, you can adjust how this will happen, by changing alignment, tiling direction and whether the image scrolls.


If you're happy with the preview, then click 'Done' to continue with any other changes you wish to make, or go to the top right and select 'Apply to Blog' to finish!

If you have any questions, please let me know! 

Friday 10 June 2011

Friday Freebies and Linking to Images

Hello lovely people! Today I've got made some super simple banners for sidebar linking. If you've got a blog page on Facebook, Twitter and you want to let people find an easy way to email you - then these are perfect for that.

I've done 3 sets of 3 images to start with, in green, purple and blue - but if you'd like to see more of these in another colour let me know and I'll try and add it in here.


Of course, these are not a lot of good if you don't know how to link to them - so I'll explain that now!

There are two options you have. Firstly, you can insert these as a picture and then link to them individually as 3 pictures. That's not necessarily a bad option, but unless you want to start making changes in your template - they will probably end up looking like this:


I prefer to group these together (like I have on my sidebar here), so an alternative option which I recommend is to add these as HTML (and don't worry, you can do that very easily in your sidebar elements).

In order to do that, you'll need to start by uploading the images you want to use to a photo hosting site such as Photobucket.

Once you've uploaded them on there, go into Blogger and go to the 'Design' page. Select 'Add an element' for your sidebar and then select the option that says 'HTML/Java Script'.

This will cause a window to pop up in which you can enter a title and a space for the code.

You'll then need to enter the following code and make the changes outlined below:

<div align="center"> <a href="URL1" target="_blank"><img alt="Image Name1" src="Image URL1"/></a> </div>

<div align="center"> <a href="URL2" target="_blank"><img alt="Image Name2" src="Image URL2"/></a> </div>

<div align="center"> <a href="URL3" target="_blank"><img alt="Image Name3" src="Image URL3"/></a> </div>


Once you have that code, you then need to change the following:
URL - This needs to be replaced with the link that you want to direct the reader to. Eg. The Twitter image will link to your Twitter page, Facebook to Facebook page and so on.
Image Name - Just enter a short phrase to describe the image. Eg.. Twitter button.
Image URL - This is the URL or web address of the image that you've uploaded to Photobucket and it should look something similar to this... http://i1219.photobucket.com/albums/dd432/LullilooDesigns/Lulliloo-background-2.gif

After you've made the changes outlined, click save and then position the element where you'd like it to appear in your side bar.

Please let me know if you have any questions!